
Overview
Ever looked around your living space and felt a sense of boredom creeping in? That old, worn-out dresser or chair you’ve had for years might be the culprit. But hold on, before you toss it out or spend a fortune on new furniture, why not give it a stylish makeover?
Revamping your old furniture pieces is not only cost-effective and sustainable, but it also allows you to infuse your personality into your home decor. With a little creativity and elbow grease, you can transform that outdated piece into a stunning centerpiece that perfectly reflects your unique style.
Key Takeaways
- Furniture makeovers are a budget-friendly way to breathe new life into your living spaces.
- You can create a personalized and sustainable home decor by revamping old furniture.
- This article will guide you through the entire process, from planning to styling and maintenance.
Introduction
In today’s fast-paced world, where trends come and go quicker than you can say “renovation,” it’s easy to get caught up in the constant desire for newer, shinier things. But what if I told you that the key to a stylish and personalized home lies not in buying new furniture, but in revamping the pieces you already own?
Listen up, my friend, because furniture makeovers are a game-changer in the world of home decor. Not only are they budget-friendly (let’s be real, we all love a good bargain), but they’re also an incredibly sustainable and creative way to breathe new life into your living spaces.
So, get ready to roll up your sleeves and let your inner DIY warrior shine. In this article, we’ll dive deep into the world of furniture makeovers, covering everything from planning and preparation to styling and maintenance. By the end, you’ll be armed with the knowledge and confidence to tackle any outdated piece and transform it into a showstopper that perfectly reflects your unique style.
Planning Your Furniture Makeover
Before you start slapping paint on that old dresser or ripping off the upholstery from your grandma’s beloved armchair, it’s crucial to have a solid plan in place. Trust me, a little forethought can go a long way in ensuring a successful and stress-free makeover.
- Assess the Condition: Take a good, hard look at the piece you want to revamp. Is it structurally sound? Are there any major repairs needed? Addressing these issues upfront will save you from potential headaches down the line.
- Decide on the Desired Style and Finish: Do you want a sleek, modern look or a rustic, farmhouse vibe? Maybe you’re feeling a little bohemian or mid-century modern? Regardless of your style preference, have a clear vision in mind before you start.
- Gather Your Tools and Materials: Make a list of everything you’ll need for your project, from sandpaper and paint brushes to that fancy chalk paint you’ve been eyeing. Trust me, there’s nothing worse than having to run to the store mid-project.
- Create a Mood Board or Inspiration Board: Gather images, color swatches, fabric samples – anything that inspires you and helps you visualize the finished product. This will not only keep you motivated but also ensure that your makeover stays on track.
Preparation Techniques
Alright, now that you’ve got your plan in place, it’s time to roll up those sleeves and get prepping. Don’t worry; we’ll take it step-by-step:
- Proper Cleaning and Sanding: This is the foundation of any successful furniture makeover. Start by giving your piece a good scrub-down to remove any dirt, grime, or old finishes. Then, bust out that sandpaper and get sanding. Not only will this help the new paint or stain adhere better, but it’ll also create a smooth, even surface for a flawless finish.
- Removing Hardware and Filling Holes/Dents: If your piece has any hardware (think knobs, handles, or hinges), go ahead and remove them. While you’re at it, fill in any unsightly holes or dents with a trusty wood filler. Smooth it out, and you’ll have a nice, even surface to work with.
- Priming and Sealing Surfaces: Depending on the material and condition of your furniture, you might need to prime or seal the surface before painting or staining. This step is crucial for ensuring a long-lasting and professional-looking finish.
- Protecting Areas You Don’t Want Painted: You don’t want to end up with a hot mess of paint splatters all over your floors or walls, do you? Use painter’s tape or plastic sheeting to protect any areas you don’t want painted or stained.
Painting and Staining Techniques
Now for the fun part – actually transforming that drab piece into a showstopper! Whether you’re going for a bold, vibrant hue or a rich, classic stain, there are a few tips and tricks you’ll want to keep in mind.
- Choosing the Right Paint or Stain: Not all paints and stains are created equal, my friend. Do your research and choose a high-quality product that’s suitable for the material and intended use of your furniture piece.
- Applying Paint or Stain Evenly and Smoothly: Nobody wants a blotchy, uneven finish, am I right? Take your time and apply the paint or stain in thin, even coats, making sure to get into all the nooks and crannies.
- Distressing Techniques for a Vintage Look: If you’re going for a shabby chic or vintage vibe, consider adding some intentional distressing to your piece. Techniques like sanding, dry brushing, or using a distressing block can create a beautifully aged and weathered look.
- Sealing and Protecting the Finished Piece: Once you’ve achieved the perfect finish, it’s time to seal the deal (literally). Apply a clear sealer or topcoat to protect your hard work from scratches, spills, and everyday wear and tear.
Embellishing and Decorative Touches
Alright, you’ve got the basics down, but why stop there? It’s time to get creative and add those personal touches that will truly make your furniture makeover one-of-a-kind.
- Adding New Hardware or Knobs: Swap out those boring old knobs or pulls for something with a little more personality. Whether you go for sleek and modern or vintage and ornate, new hardware can instantly elevate the look of your piece.
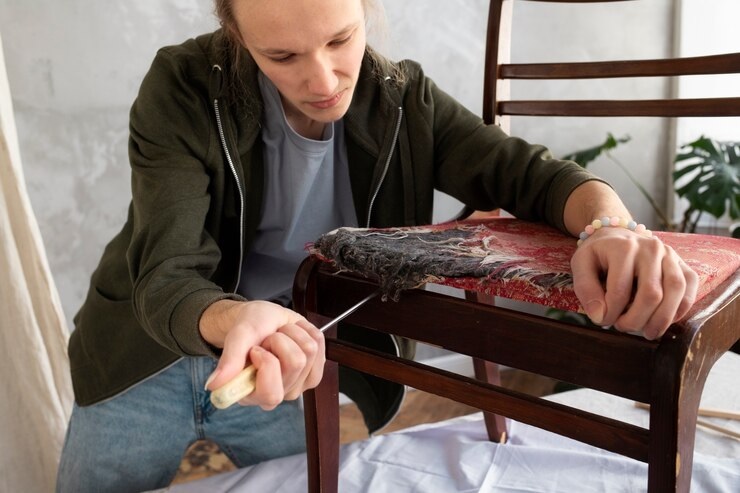
- Upholstering Seats or Headboards: If you’re working with a chair, bench, or bed, consider reupholstering the seats or headboard with a fun, eye-catching fabric. Not only will it add a pop of color or pattern, but it’ll also give your piece a fresh, updated feel.
- Decoupage or Stenciling Designs: Get creative with decoupage (the art of decorating an object with paper cutouts) or stenciling designs onto your furniture piece. This is a great way to incorporate unique patterns, images, or even personal mementos into your makeover.
- Incorporating Unique Materials: Don’t be afraid to think outside the box when it comes to materials. Wallpaper, fabric, even old maps or sheet music – the possibilities are endless for adding texture and interest to your furniture piece.
Styling and Staging Your Revamped Furniture
Congratulations, you’ve made it to the home stretch! Your furniture makeover is complete, and it’s time to show off your hard work. But before you start snapping those Instagram-worthy pics, let’s talk about styling and staging.
- Incorporating Your Makeover Piece into Your Home Decor: Think about where your revamped furniture will live and how it will complement the existing decor in that space. Consider colors, textures, and styles to create a cohesive and inviting vignette.
- Accessorizing and Styling Tips: Don’t be afraid to accessorize your newly made-over piece! Add some throw pillows, a cozy blanket, or some stylish decor items to really make it pop.
- Creating Vignettes or Focal Points: Arrange your furniture piece in a way that draws the eye and creates a focal point in the room. Group it with other furniture or decor items to create a visually appealing vignette.
- Photographing Your Finished Project for Social Media: Let’s be real, if you don’t snap a few pics and share your furniture makeover with the world, did it even happen? Find the perfect angle, adjust the lighting, and get ready to bask in the glory of your hard work. Who knows, you might just inspire someone else to tackle their own DIY project!
Maintenance and Care
Alright, so you’ve put in all this effort to create a stunning, one-of-a-kind piece – now it’s time to make sure it stays looking fabulous for years to come. Here are a few tips for maintaining and caring for your revamped furniture:
- Protecting Your Revamped Furniture from Wear and Tear: Invest in some high-quality furniture pads or coasters to protect your newly made-over surfaces from scratches, water rings, and other unsightly marks.
- Cleaning and Touch-up Techniques: Spills and mishaps happen, but that doesn’t mean your hard work has to suffer. Keep a furniture polish or touch-up paint on hand for quick and easy clean-ups and touch-ups.
- Storing and Moving Your Furniture Safely: If you ever need to move or store your furniture piece, take the necessary precautions to protect it. Use furniture blankets or pads, and be extra careful when lifting or carrying it to avoid any damage.
Inspirational Furniture Makeover Ideas
Now, I know what you’re thinking – “That’s all well and good, but I need some serious inspiration before I dive into this furniture makeover thing.” Fear not, my friend, because I’ve got you covered!
Here are a few jaw-dropping before-and-after transformations to get those creative juices flowing:
Before and After: A Dresser Transformation
| Before | After |
|---|---|
 |
 |
| An outdated, worn-out dresser | A stunning, farmhouse-inspired piece with a distressed finish and new hardware |
Unique and Creative Makeovers
- A vintage suitcase turned into a stylish side table
- An old door transformed into a rustic, one-of-a-kind headboard
- A set of mismatched chairs given new life with a bold, colorful paint job
And if you’re in need of even more inspiration, be sure to check out the work of these talented furniture makeover bloggers:
- Meg from MegDelDesign: With a focus on budget-friendly and sustainable home decor, Meg’s blog is a treasure trove of creative furniture makeovers.
- Lora from LoraBloomquist: Lora’s passion for revamping thrifted and secondhand furniture shines through in her gorgeous before-and-after projects.
- Amy from SeekinLavengerLane: From bold and vibrant makeovers to elegant and sophisticated transformations, Amy’s blog has something for every style.
Conclusion
Whew, what a journey we’ve been on, eh? From planning and prepping to styling and staging, we’ve covered all the ins and outs of furniture makeovers. But the real question is, are you feeling inspired to tackle your own DIY project yet?
Just think about it – by giving that old, outdated piece a fresh, new look, you’re not only saving money and reducing waste, but you’re also creating a truly unique and personalized addition to your home decor. And let’s be honest, there’s nothing quite as satisfying as stepping back and admiring a piece that you’ve poured your time, effort, and creativity into.
So, what are you waiting for? Dust off that forgotten chair, dig out that neglected dresser, and let your inner DIY warrior loose! With a little bit of elbow grease and the tips and tricks you’ve learned here, you’ll be well on your way to revamping your furniture with style.
And remember, the journey doesn’t have to end here. Keep exploring, keep creating, and most importantly, keep having fun with it! Who knows, you might just discover a new passion for furniture makeovers – or at the very least, a newfound appreciation for the beauty that can be found in transforming the old into something fresh and fabulous.
Now go forth, my friend, and let your furniture makeover dreams come to life!